My Website address for my evaluation:
http://98chloecarman.wix.com/as-media-evaluation#!gallery/c1p9k
My final Opening title sequence:
My final continuity tasks:
Tuesday 31 March 2015
Monday 16 March 2015
Friday 13 February 2015
Target audience
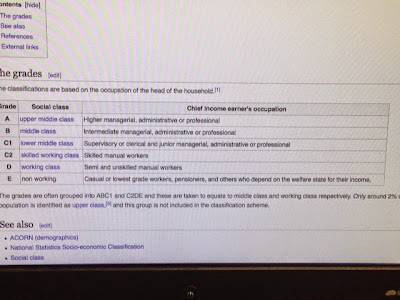
Before deciding a final target audience for a film within the industry, film makers do a lot of reattach using different ways of categorising target audiences to make sure the film is right for them. One way the film industry use to categorise their audience is by the NRS social grade. This system categorises people by their job. There are 6 gradings in this method- A,B,C1,C2,D,E.
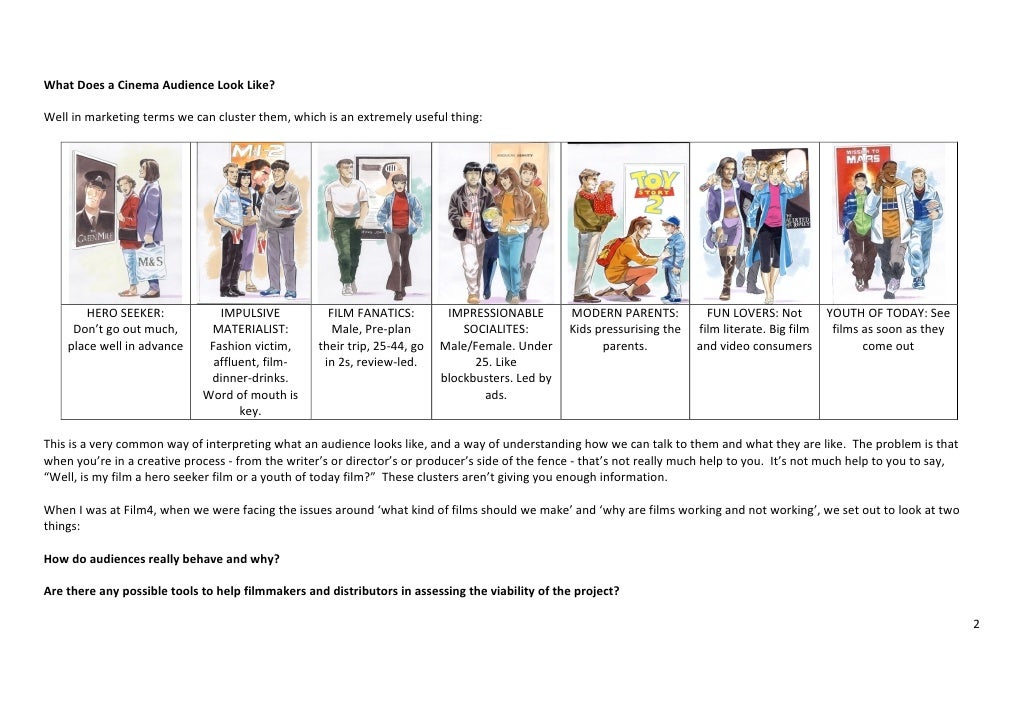
Another way of deciding on a target audience is by using the Pete Buckingham Audience model. This divides the audience into seven categorises- Hero Seeker, Impulsive materialist, Film Fanatics, Impressionable Socialites, Modern Parents, Fun Lovers and Youth of Today.
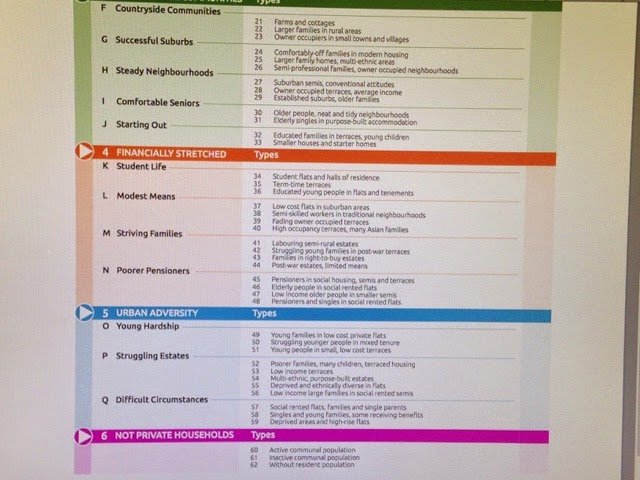
There is also the Acorn structure where there are six headings, and each heading has a series of subheadings dividing the groups further and places people into specific target groups. the acorn structure divides people into where they live, the type of house they live in, and the lifestyle they live.


The audience theory has an Effects model that also follows six headings based on how people react to media products. It structures people by the way they behave to a film or by media product
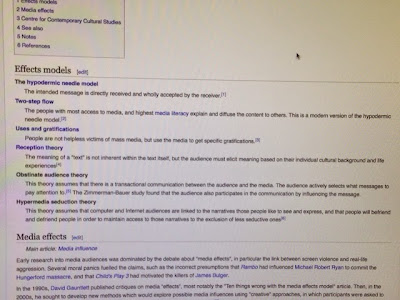
all these methods will help us to decide what target audience we want our film to be based for. We must discus as a pair what people would be most likely to watch our film, and how they will react to it. Using the NRS grading traditional film noir's attracted upper class, well educated people. Neo noir's are based for the film noir audience members, and for people slightly younger because of the modern twist that neo noir puts on film noir. We have used all the structures to finalise what target audience we are going to base our film for. Using the NRS guide we have decided we want to aim it at people in band A,B and C1, so we attract all the educated people that would see film noir style, and slightly younger audience members that see neo noir's. Using the Effects model we are aiming our film at The Hypodermic Needle Model as we want the audience to feel involved, and believe our film. Using the acorn structure we have aimed our film at Affluent Achievers, Rising Prosperity and Comfortable Communities. This is because people who have more money and live the lavish lifestyle will connect more to our glamorous femme fatale. Using Pete Buckinghams method we have aimed our film at Film Fanatics and Impressionable Socialites, because we want to aim at those aged particularly around 25, but we want to interest people who are slightly older and younger as well because of the neo noir twist on film noir.

Another way of deciding on a target audience is by using the Pete Buckingham Audience model. This divides the audience into seven categorises- Hero Seeker, Impulsive materialist, Film Fanatics, Impressionable Socialites, Modern Parents, Fun Lovers and Youth of Today.
There is also the Acorn structure where there are six headings, and each heading has a series of subheadings dividing the groups further and places people into specific target groups. the acorn structure divides people into where they live, the type of house they live in, and the lifestyle they live.

The audience theory has an Effects model that also follows six headings based on how people react to media products. It structures people by the way they behave to a film or by media product

all these methods will help us to decide what target audience we want our film to be based for. We must discus as a pair what people would be most likely to watch our film, and how they will react to it. Using the NRS grading traditional film noir's attracted upper class, well educated people. Neo noir's are based for the film noir audience members, and for people slightly younger because of the modern twist that neo noir puts on film noir. We have used all the structures to finalise what target audience we are going to base our film for. Using the NRS guide we have decided we want to aim it at people in band A,B and C1, so we attract all the educated people that would see film noir style, and slightly younger audience members that see neo noir's. Using the Effects model we are aiming our film at The Hypodermic Needle Model as we want the audience to feel involved, and believe our film. Using the acorn structure we have aimed our film at Affluent Achievers, Rising Prosperity and Comfortable Communities. This is because people who have more money and live the lavish lifestyle will connect more to our glamorous femme fatale. Using Pete Buckinghams method we have aimed our film at Film Fanatics and Impressionable Socialites, because we want to aim at those aged particularly around 25, but we want to interest people who are slightly older and younger as well because of the neo noir twist on film noir.
Thursday 5 February 2015
Second version of our OTS
This is our opening title sequence with all the sections of music in it. This is the second video we will show the class to get there feedback on how the different sections of music work with the clips, and if they have any advice of how we can link the sections of music. i have made some of the colour improvements that the class commented on in the last feedback, but with this level of software, i think its the best affect we can achieve. Megan will focus on the sound while i continue to work on the colour correction/mask, to see if it is possible to get the colour any better.
megan and chloe OTS from chloe carman on Vimeo.
megan and chloe OTS from chloe carman on Vimeo.
Monday 2 February 2015
First feedback
This is the video of our class mates telling us how they feel about our opening title sequence. We are still in the editing process, so there is still sound to be added, titles and finishing touches. Since this was filmed, we have made some improvements on the colour. The colour seemed patchy because of the light, and the movement of the red. I haven't been able to fix the colour problem completely but I will continue to try and fix the colour problem. From the feedback we have considered the drowning scene and thought about what they said, but in the narrative the body was put there by the police. The look of the body (still pretty, and half dry) symbolises she is working with the police and not against them. the half wet look shows she has been there a while and has dried.
OTS first feed back from chloe carman on Vimeo.
OTS first feed back from chloe carman on Vimeo.
Thursday 29 January 2015
Drowning shot
This is the footage we are using for the drowning scene. The reason why I'm half wet is because i have been there a while because in the story line i pretend to drown myself, but in reality i am still alive. I am in that position because the police (who are in on the act) have dragged me out of the river, and placed my body like that. In traditional film noir's, the femme fatale always looks beautiful whether they are dead or alive. This is the look we where going for in order for our femme fatale to seduce even though she is supposedly dead.


Adding Titles
In an ideal situation we would of liked our titles to be an old fashioned looking font, but all of the fonts that were old fashioned were thin, and blended into the background of our clips. It was hard to find a shade of red that wasn't so bright that it was too light, or one that wasn't too dark so it didn't blend into in the darker scenes. We want all the titles to be the same colour and size so there is continuity.

Friday 23 January 2015
First version of our OTS
This is the first version of our opening title sequence. We have edited it roughly, and changed the colour to black, white and red. The problem with have is we move quite a lot, and with this level of software we can't outline the section we want red, which means that when we move and a light is casted over, the red turns black and white and looks a little amateurish. We haven't added any sound yet, the only sound we want is the diagetic sound of the rolling bottle and the shh's. We are yet to add the titles and select where they are going. We have a rough idea of where but it is yet to be finalised. This is the version we will show to the class for some initial feedback to make changes as we progress.
megan and chloe OTS from chloe carman on Vimeo.
megan and chloe OTS from chloe carman on Vimeo.
Saturday 17 January 2015
Editing: day 4
Adding transitions
Today we learnt how to add transitions between two clips.
Press the button with the four triangles. There will be a selection of transitions available. We picked cross dissolve to give our clip a spooky echoing feel.

Today we learnt how to add transitions between two clips.
Press the button with the four triangles. There will be a selection of transitions available. We picked cross dissolve to give our clip a spooky echoing feel.
Drag the cross dissolve button between the two clips that you want to overlap. To change the size of the transition, press the clips and drag it from the sides to make it longer or shorter. The transitions can also change speed if the clip already has s set speed, the transition will do that to.

Editing: day 3
Slow motion
Today we figured out how to put a clip into slow motion.
To make a clip slow motion you press on the microphone with the arrow. A pop out menu will appear, and you click the 'slow' option at the top.

once the option has been pressed you get the choice of three speeds. 50% is the quickest slow motion option and 10% is the slowest. Select the one that suits you.


Monday 12 January 2015
Editing: day 2
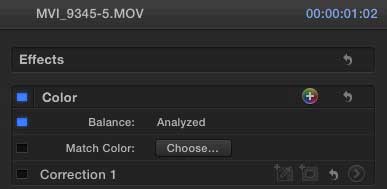
Today we played about with colour. We want the title sequence to be black and white but we still want the red. This is called chromaki. you do this on final cut pro by pausing on the clip where the red is showing. Once you click on the colour
menu, press the plus button to add a colour correction. Click on the dabber and use it to highlight the red area of the clip. This creates a colour layer,Then you press the arrow button next to the dabber option. Make sure the inside option is highlighted at the bottom, and the setting is on global. Slide the slider on the left up to the top for a bright red look. Then press outside and click global again and slide that down to the bottom. This takes the colour away from the background, and leaves the area you just highlighted red. I have also learnt that final cut always reads the top line of your timeline. This means anything you edit much be on the top line, or it won't show up when you press play.

menu, press the plus button to add a colour correction. Click on the dabber and use it to highlight the red area of the clip. This creates a colour layer,Then you press the arrow button next to the dabber option. Make sure the inside option is highlighted at the bottom, and the setting is on global. Slide the slider on the left up to the top for a bright red look. Then press outside and click global again and slide that down to the bottom. This takes the colour away from the background, and leaves the area you just highlighted red. I have also learnt that final cut always reads the top line of your timeline. This means anything you edit much be on the top line, or it won't show up when you press play.
Editing: day 1
Today we uploaded all of the footage onto final cut pro, and we have decided what footage we are going to use, and what footage we aren't going to use. We put the good footage onto a time line and checked if we had enough footage to make up the two minute time limit for our opening sequence. Our footage can to approximately six minutes but once we cut down all the clips and work out the transitions it should be roughly two minutes. We haven't yet put the clips in order as wanted to look over the clips and see if we needed to re-film anything. Once we looked at the footage we decide to film the type writing section again as it goes blurry towards the end.
Filming: day 2
We have now finished all of our filming for our opening title sequence, all we need to do is to put everything together, edit, add the titles, add the backing track, and add the digetic sound. We had a struggle with angles. we knew what shots we wanted, but we didn't know how was best to create them when it came to shooting. Megan was the camera person for most of the shots. The only time i have had to get behind the camera is when you see someones hands. I don't like my hands and nails, but Megan has nice hands and nails, but didn't want to be in front of the camera. We solved this by making Megan my 'hand double' and used her hands for all the clips where her gloves are off. I decided to wear leather gloves for most of my shots so you can't tell who's hands they are when they are covered. This is the last shot we done. We had to make this our last shot as I had to get water thrown over me to make it look like I have been dragged out of the river by the police after she committed "suicide". It was a really cold day we were filming on, and the ground was frosty, so we had to tip warm water over me, and we only had one take to film it because I was really cold.
Subscribe to:
Posts (Atom)